The Perfect Pork Chop: Sous Vide


For years I have been reading about this fancypants sous vide cooking and the hyperbole about the resulting end product.
Phrases such as “The juiciest steak ever”, “The meat falls of the bone in a stiff breeze”, and “The closest thing to a sexual experience involving a knife and fork”.
The last quote was spoken by me to Sweetpea after taking a bite of perfectly cooked pork chop. I love a medium-rare pork chop though I’ve never been able to get but a medium-rare nugget in the center of the chop through any cooking method I’ve employed. With sous vide, the entire chop is medium-rare, side to side, top to bottom.

Sous vide means “under vaccum”. I have a vaccum sealer but chose not to use it in favor of Ziploc freezer bags and expelling the air by hand. The food is cooked at a very precise low temperature and takes many times longer than any cooking method I’ve yet tried. If you want a steak cooked rare, let it go for 2 hours at 131 degrees F. Want some amazng short ribs? 141 F for 2-3 days. Sounds wrong but it is safe and tastes so right.

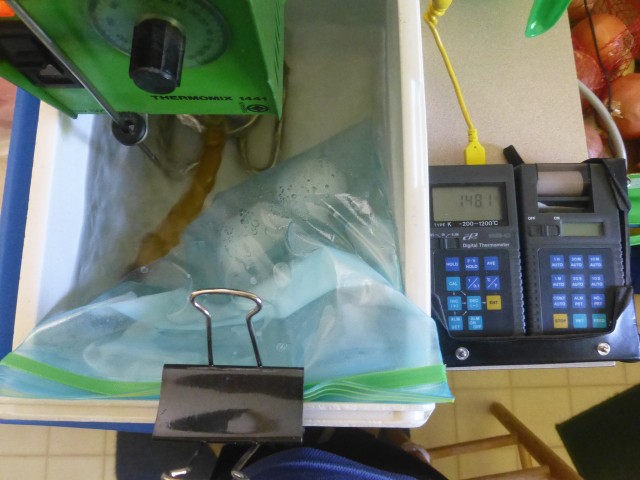
Yesterday morning I got up and surfed around to see what I would make for dinner. I stumbled on an intro to sous vide cooking. Upon seeing the equipment I realized that I already had all the necessary equipment and was ready to go. I really lucked out as I had a laboratory immersion circulating heater from my days in bio-lab work. I also had a digital thermocouple thermometer and stainless probe. And finally, I had a 6-pack beer cooler. I added a lab ring stand base to clamp and hang the heater at the perfect position in the cooler. A test run showed that I could keep the temperature within 0.1F of my desired temperature! It was the perfect storm, from zero to a sous vide system in less than 30 minutes.

I was fortunate to have brought the circulating heater home from the lab many years ago. It turns out it is the method preferred by fancypants chefs and is the most accurate way of maintaining the correct temperatures. They’ll put you out $800 – $1,500 for a new one, $200 – $600 for a used one (eBay, LabX). Mine was being tossed by a research group that was moving to another university. Thank you wasteful scientists!

Image

For a basic primer on sous vide cooking see this.

Want to hack your own system using just a cooler and a combo of hot and boiling water? See this. It’s a great way to experience sous vide and decide if you want to take the plunge into the deep end of the gourmet pool and never come up.

If you’re a handy bugger you can make your own circulating heated bath for about $75 by following these instructions.

Enough with the tech, let’s move on to the food.

I started with boiling two eggs. I had read that the best boiled eggs in the world are only 60 minutes away and this was absolutely correct. I put the eggs in a Ziploc bag with about a cup of water and squeezed the air out.

Image

I then dropped the bag into the water bath at 148 degF and let them go for around 70 minutes.

Image

The eggs came out spectacular. I gently thumped them and poured them into a dish. Just like a poached egg but better. They weren’t raw, as a matter of fact they are fully pasteurized by this cooking method. The yolks were unbelievable; a silky, custard texture with the mouthfeel of, well, I’ve never had something so sexy in my mouth and been allowed to swallow it before. Yeah, that good. I don’t know any other way to cook an egg like this. It was perfect.

Image

The picture ain’t great but the egg sure as hell was.

After such a stellar success I decided it was time to grab my meat and get busy. I had a pork loin chop that was making dining room eyes at me all week. I decided to brine it in a salt & sugar brine for an hour. I put 2 Tbsp of salt and 1 Tbsp sugar in 2 cups of water and called it good. I suppose you could brine it overnight but my results were so good that I doubt I’ll try it.

I took the chop from the brine and patted it dry with some doubled paper towels. I then sprinkled it with salt, pepper, and garlic powder, that’s all. Into the Ziploc freezer bag it went. I dropped it in the bath at 141 degrees and let it go for 2 hours.

Image

After 2 hours it looked like this:

Image

Not very appetizing, is it? That’s why a quick pan searing or grilling is necessary. I heated my cast iron skillet to 5,000 degrees (actually, whatever the temp is on a medium electric burner) until I could smell the metal, slopped a spoonful of peanut oil into it, and slapped the chop down for 1 minute per side. This gives the outside that smoky and browned crust that we all adore.

Image

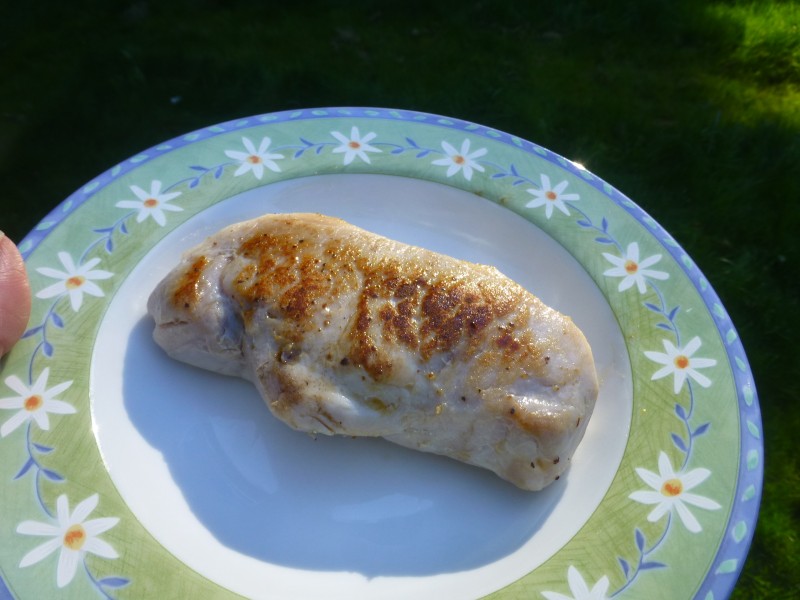
When I cut it open I was greeted by a happy light pink color, the color that I’ve always wanted a chop to be, and it had that color through and through (except for a few millimeters on the sides I seared).
The chop was bursting with juices, the moistest chop ever! The texture was quite unlike anything I’ve ever had. It’s like eating a pork chop with the texture of a filet mignon or prime rib. I cannot adequately describe it.

Image

Go ahead, make your own beer cooler / hot water sous vide cooker and try this out. You will not regret it.

Fireworks, Fasteners, and Fabulous Food


This is my busy season. Fireworks shows, fun in the sun, and prepping for Burning Man. Rather than writing the thousands of words that I’d like to, I’ll post a dozen pics instead.

Wheee!

Mad Max and the Zen of Exterior Decorating


What started as a simple paint job has taken on a life of its own. Each day I see something that can be added or improved upon. Each day brings more WTF looks, WHY? comments, and COOL! compliments. In addition to the appearance enhancements, I have been treating Rambette to many badly needed structural upgrades and powerplant maintenance services. These last two have me at around $1,500 which isn’t as bad as it initially sounds. I’ve saved massive amounts of money by changing the oil every 30,000 miles (instead of 3,000 miles as recommended by big oil and their whores at the motor oil companies) and neglected nearly every other maintenance procedure. You know the old saw about not fixing what’s not broke… Rambette is at 108,000 miles and still going strong.
Recent maintenance points:
New engine oil, differential & transfer case gear oil, power steering fluid, brake fluid, and engine coolant & thermostat
New spark plugs and wires
New shocks, coil springs, and sway bar end links
New mass air flow & throttle position sensors
New parking brake shoes
New PCV valve and hose
New driver’s side power mirror
New serpentine belt and idler pulley
New front CV halfshafts (axles)

All of these I have done myself and saved a couple thousand dollars in the process. Most of these things YOU, dear reader, can do for yourself. All it takes is a manual, a little bit of time, and suspension of disbelief in yourself. You may have to buy some tools but the cost of these is inconsequential in the big picture. You will still save money, lots of it, and have some pretty cool tools to mystify your friends with.

Recent appearance upgrades include:
Tail light blackouts
Hood, body, and trim details
Lift points on the hood
More paint…

Enough words, more pictures!

To get to the spark plugs, remove this…

And these…

And you’ll end up with this:


Installing the new axles. Foxfur loves him some big and sexy tools. The ratchet drive handles pictured are 3/8, 1/2, and 3/4 inch. The 3/4 inch drive handle is not absolutely necessary but sure is handy. The set I have (Proto) will cost you around $600 unless you can find a used set. Mine were free. Right time & place and all that.

New at the top, old at the bottom. The old rubber boots were torn and letting in dirt and crap. It took less than 1 hour per side. To put that in perspective, the spark plugs took 3 hours. It would have been faster but me & Mr. PBR took our time…

Struts, coil springs (and new tool: spring compressor!), cabin filter, MAF, TPS, PCV, etc.

On to the appearance upgrades.

The tail lights were so bright as compared to the paint job that I decided it was time to balance them out. I initially used a tinting spray:

It’s from VHT. I wasn’t very impressed. It’d be ok for building a normal rice racer but looked a bit too glossy for Rambette. I remasked the lights and shot them with flat black.

I came up with the design on the fly and ended up with this. Now it looks like this:

They are nice and bright at night but look cool as hell 24 hours a day.

A friend posted this pic of a Hyundai Elantra on my Facebook page:

Find the entire story here.

It gave me the idea for my next project.

I had a box of 500 3/8 x 1 inch long stainless steel bolts lying around just waiting for that special project. In just 24 hours it went from this:

To this:

The lift points are simple 1/2 x 5 1/2 inch U-bolts from the hardware store.

I also got my veterans license plates! $34 to the state. If you’re a vet please look into getting yours. It will increase public awareness of just how many of us are out there and will allow vets to identify each other.

One night last week I was out in the front yard testing out Grizelda MK VI, my fire poofer, after upgrading the accumulator with an old 5 gallon propane tank. The accumulator allows more on demand volume for poofier flames.

What once looked like this:

Now looks like this:

And just for poops and guffaws, I decided to see how it would look atop Rambette:

Seriously.
Get off my lawn.

Another recent project having to do with Burning Man (besides Rambette and Grizelda MK VI) has been stencils. You saw the BURN SHIT one above. The other one is “KEEP BURNING MAN POTENTIALLY FATAL” which is a plea to the organizers to not try too hard on the whole safety thing. Not that they’re going to, but, with 60,000 people there and an estimated 70,000 in coming years, it represents a real threat to my enjoyment of dangerous good times in the desert.

One more Burning Man related score. I found some hot short shorts that match my orange unsafety vest!

Until next time…


Gas Cans: Less Safety, More Fun!


One of my hot buttons is when people try to protect me from myself. In some cases this might be tolerable but those are few and far between. What am I bitching about? The adult-proof ‘safety’ cap / spouts on gasoline cans. They take too many hands to operate!

Here we have two gas cans:The one on the left is modified while the one on the right is not. Yet. Also shown is a pair of diagonal cutters necessary for the following upgrade.

Here are the two ‘safety’ items I despise. The spring-loaded “Lock – Pour” lever and the thumb busting cap lock.

I’m all for safety, just ask my friends (!). But, when some ne’er do well safety faker shoves their hot buttered ‘safety’ features in my foxhole, well, I don’t take too kindly to ’em. Probably some condo dwelling cityslicker who’s never mowed a lawn in his life, hmm? Back before people got all worried about children playing with matches and gasoline we had the venerable 5 gallon jerry cans with a mouth so wide you can land a match in it from across the living room.

In the lower right you see a flexible metal spout that we affectionately called the donkey dick in the army. Why? I don’t have a clue.

So, wanting to go back in time to when things were simpler and less safe, I wanted an easier way to use my newfangled gas cans. I don’t savor having to use features I’m not interested in and didn’t ask for let alone ones that are inconvenient and clunky. While this might sound thickheaded, I never had any problems with using a donkey dick or even the plain, wide open plastic nozzle. I never had any leaks around the cap that a thumb busting ratchet assembly could ever have helped. ‘Safety’ feature creep has gone on for years and has reached the level of insult and I’m not going to take it lying down. The reasons for over regulation are manufacturer’s fear of liability from stupid people who’ve had to pay the stupid tax after setting themselves on fire (eugenics by fire) and the nanny-state adult babysitters at the CPSC (Consumer Product Safety Commision). I’m not just sticking it to the man, which is loads fun all by itself, but also asserting my first amendment right to the pursuit of happiness. Enough ranting (for now).

Here’s a view under the handles. The black one has not been modified, the green one has. You can see the black plastic ‘spring’ on the unmodified one. It is what forces the dispense switch back to the store position when the dispense handle is pressed and causes it to lock as soon as it’s released. In order to dispense again you must move the switch back to the pour setting.

The diagonals are pointing at the spot that must be cut.

The ‘spring’ as cut and removed. It requires quite a bit of cutting force to cut through. A utility or x-acto knife may be used in place of the diagonals.

The switch in the store (locked) position:

The switch in the pour (unlocked) position:

The thumb busting cap lock. It is forced to engage with the tank mounted locking tooth by two plastic ‘springs’ at the top end of the cap.

Here’s where to cut the springs. After cutting the first one, cut the other one just like the first.

The thumb busting cap lock as removed.

After removing the flexible spout from the filler neck you can use the cap from it to seal the can. We store our cans outside (you should too) so it keeps the rain out of the spout.

Again, these ‘safety’ features, once removed, do not make the cans any less safe when used correctly. I would not suggest removing them if you have small or dumb children running around willy-nilly and irresponsibly unsupervised. Older children can be taught to either keep their grubby paws off the damned cans or to use them responsibly in the same way that you teach them that knives are sharp and can significantly reduce the number of useful fingers installed on their hands.

The self relocking feature is completely unnecessary for adults. Imagine if your car doors had the same feature to prevent unauthorized opening thereby preventing fingers being trapped between it and the car body. If you can remember to lock your door or turn a power switch off after using an appliance then you should be able to remember to lock the can handle after use.

One thing that should be considered is that your insurance company might be less than impressed if you had a fire and they discover that the ‘safety’ features had been tampered with. Luckily for you, gas cans are quite flammable and any evidence of tampering should be quickly melted into oblivion seeing as how the fire will most likely occur near the can. In the unlikely event that the can is not destroyed by the fire, well, I’ll leave that problem up to you.

So there you go. Foxfur has taught you how to remove ‘safety’ features from dangerous objects and how to commit insurance fraud. Not bad, eh?

How To Paint Your Vehicle For 70 Bucks


Y’all have probably seen Smurfette, my 2006 Kia Sportage 4×4 buggy. She just turned 105,000 and I decided to give her some new paint to celebrate this milestone. I used to paint my 1974 Datsun pickemup truck twice a year to change things up and to confuse the sherrif. This was 20 something years ago but the urge has been strong to do up Smurfette in the last few years. While I used to be able to do it for $12 back then, prices have gone up considerably. The upshot is that paint has improved as well.

Here’s what she looked like at 2,000 miles:

I’d been talking about new paint for the last few months. When I told Sweetpea, she said I’d lost it. Hell, I lost it yeeears ago and she knows it.

Last Saturday afternoon I was pretty bored. I headed down to Home Depot at 3 in the afternoon and got some paint:

I paid $5 a can but you can get a 6 pack for $24 when you order online.

I also picked up some masking tape, a roll of paper to mask the windows, and a Rust-Oleum Comfort Grip; a pistol grip can holder that’ll save you from carpal finger.

On the way to the Depot I stopped at the quarter wash and washed the hell outta the old girl. I got home and pulled the headlights out and masked the windows.

I got 10 cans of Deep Forest Green and 3 cans of Ultra Flat Black for the trim. I started at 5pm and finished by 9. Due to impending rain I went out at 11pm and shot the trim with black. Good thing too! I woke up to rain the next morning…

She came out awesome! This Thursday I’m heading over to he Bat Cave at Espressodude’s place to stencil it up. Let the confusion begin!Almost looks like I know what I’m doing. Think I’m gonna have to rename her. How’s Rambette sound?

There you go; a $70 paint job!

Pyro School: Special FX Fireworks & Mobile Flamethrowers


I attended another pyrotechnics course at the same place as I took my general operator’s courses. The class was focused on proximate fireworks: fireworks designed to be used quite close to audiences and performers in theater, movie, television, concert, and sporting venues.

Flashpots, strobes, comets, crossettes, mines, gerbs, lances, airbursts, etc. Lotsa stuff to choose from. I’ve made and used many of these over the years and had a great time with them. You’d be amazed to see how close you can be to a properly designed and constructed pyrotechnic device…

The special FX pyrotechnics demo set up outside the classroom.

Comets and crossettes.

A concussion mortar. Loaded with an ounce of flash powder and ignited by an electric match, it sounds like a cannon…

Here’s my video of the live fire demonstration given today:

Also demonstrated was a commercial flame projector. Though nothing like the ones that I build, it’s still impressive for the simplicity of the device.

A commercial flame projector (“poofer”).

A view of the projector’s gas orifice and hot surface ignitor.

A video of Ken explaining and demonstrating:

Another highlight at today’s class was my friend Espressodude whom I build stuff with and camp with at Burning man. He has built “The God of Hellfire”, a motorized flame effect platform that traverses a full 360 degrees and elevates from 0 to 90 degrees (horizontal to vertical). With twin “flamethrowers” and an all electric firing system, it is quite possibly the coolest thing I’ve ever seen anyone build in their garage. He brought the flamethrowers out to my property a few weeks back for testing after the fire department asked him not to do it at his house anymore… Today was the first full system test. He had a custom trailer built to carry the self mobile platform that allows operation without unloading.

GoH in action.

His “Field Artillery Tractor” which is the tow vehicle. He built this during the winter of 2010.

Rear view of GoH.

A video of the God of Hellfire in action today:

I’ll share more on this particular project in weeks to come…

Cooking with Foxfur: Pasta Salad with Bolt Cutters


We’re in the middle of a heat wave with temperatures in excess of 73 degrees. Don’t laugh, it’s Oregon. It’s warm enough to dry out the webbing between our toes and evaporate at least an inch of water from the front yard. Seeing as how summer’s here, for the next three days anyway, I felt it was time for whipping up some summer fare: Pasta salad.

I decided to cook the pasta outside lest I risk heat stroking the cat and otherwise negatively affecting indoor air quality. I have a propane stove I made from a barbeque that someone threw off the bridge and into the creek last summer. That’s the thing with living in the sticks, it’s a free dump for the cityfolk. I wrassled the thing to shore with a comealong and removed the side wing burner assembly. I welded up a frame and stand from scrap angle iron and water pipe (that’s bong to you hippies) and since the burner valve was damaged I installed a propane regulator from a dead BBQ out in the yard. So I went out to use Frankenstove and LO! The burner grate thingy was gone!

Similar to cast iron, don’t clean it once it’s seasoned…

After turning the kitchen upside-down and finding no cooling racks, much to Sweetpea’s delight (Mrs. Foxfur), I decided to use the steel mesh from my gold dredge’s sluicebox. One problem: it wasn’t there either. I finally found something that would work:

Good thing the plastic was there to hold the rust together. I used the blade on the BBQ brush to knock the plastic off and the bristles to shine it up a bit.

A little pruning with the bolt cutters…

Let’s see Bobby Flay do this!

That being done, it’s time to start cooking.

Tuna Pasta Salad

  • 2 Cups pasta (shells, elbows, bow-ties, anatomical shapes)
  • 1 Cup mayonnaise (or Miracle Whip)
  • 1 Tsp Salt
  • 1 Tsp Sugar
  • 1 Tbsp Vinegar (cider, white, rice, glacial acetic acid)
  • 2 Tbsp Mustard, prepared (yellow, dijon, honey mustard)
  • 2 Pinches & 1 Dash black pepper
  • 3 Bell peppers or enough to equal 1 Cup when minced
  • 1/2 Medium onion or enough to equal 1/4 Cup when minced
  • 1 Cup green peas (1/2 can)
  • 1 5 – 6 Ounce can of tunafish

Fine Fixin’s

Set 2 quarts (4 cups) of water on to boil. Add a few dashes of salt. When boiling, dump yer pasta in.

You probably know how to do this but I’m having fun with the new camera and it just looks cool. This camera has a special food mode. My food is special.

Let it go for 8 – 10 minutes until it’s done how you like it. I like mine all denty like (al dente for you purists). Then drain it. If you don’t have a pot lip strainer, get one. Mine is stainless steel from IKEA. It’s imported (from Vietnam)!

Set the pasta aside to cool.

Now we’ll prep the veggies. I recently acquired an incredible ceramic knife. It’s the only knife I’ve ever had that will slice through a piece of paper just like Zorro can do! Got it at The Grocery Outlet, or as Sweetpea likes to call it, The Grocery Whorehouse: You never know what you’re gonna find but it’ll be cheap. Price wise, not quality wise. It’s like a garage sale for food!

I minced the onion up really fine, about the size of pickle relish. You don’t want (I don’t want) big chunks of onion. I mince the peppers a bit bigger. While cutting up the yellow pepper I found clear evidence of either alien life or genetic engineering within:

The tentacles retracted every time I tried taking a photo so you’re just gonna have to trust me…

The veggies were done thusly:

Sexy vegetables!

Combine the mayo, vinegar, salt, sugar, pepper, and mustard. Now whip it, whip it good. Slather it all over the pasta and mix until homogenous. That’s a big word. I like big words. Fold in the veggies until evenly dispersed. If done semi-correctly, you may just end up with something like this:

I like to throw all sorts of tidbits in mine. Diced ham, cheese, bacon, corn, green onions, crabmeat, etc. Don’t get too hung up on amounts of ingredients. I vary the amount of mayo and seasonings depending on how crazy I get with the tidbits. I’ll leave out the vinegar for the unadventurous and serve it on the same plate as their PBJ with the crusts cut off. You know their kind.

Get reckless with this salad. If you mess it up, put it in a nice bowl, cover it with foil, tie a ribbon over the top, and bring it to your neighbor. Just be sure to get your bowl back…